- Published on
Show Custom Agent UI Inside the Chat Conversation
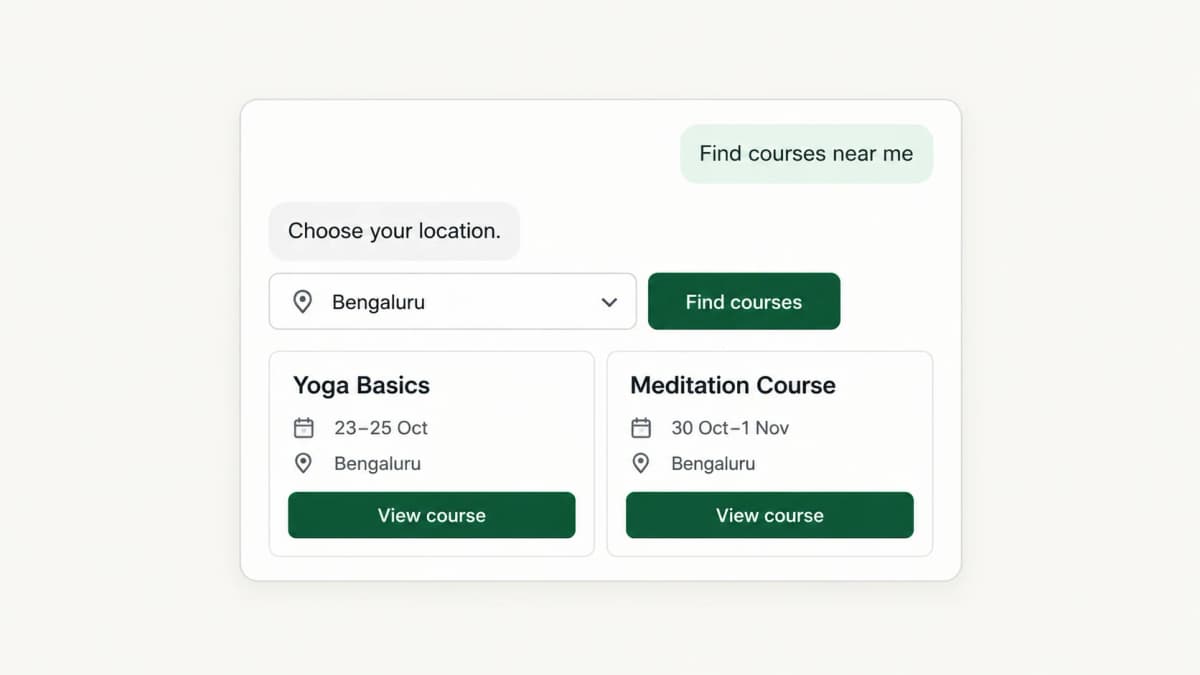
Try it live: Open the AOL Guide chat demo, ask for courses near me, then choose a city or town in India when the location picker appears.
Most website chatbots are still stuck in text.
The user asks. The assistant answers in a bubble. It might call a tool behind the scenes, but what the visitor gets is still a paragraph.
That works. It just isn't always the best interface.
Found a set of products? Cards beat prose every time. Need the visitor's email? A small form beats asking them to type a sentence. Course results, store locations, appointment slots, account details, search results: the best answer is often a real UI component, right inside the conversation.
Predictable Dialogs web widgets make this possible with Agent UI: custom components registered with agentUi.components and styled with agentUi.css.
The official guide is here: Render Tool UI in the Conversation.
Two Ways to Start Adding UI to Chat
There are two practical entry points.
1. Reuse what you already have. In the course-search example below, the web app already has an interface for searching courses. We simply bring that same interface into the chat.
This changes how the conversation flows. Instead of hard-coding a fixed sequence of questions, the LLM reads the user's intent and shows the right component at the right moment. The user enters information through an interface they already know, without leaving the conversation.
Already have a web app? Start here. Pick the components that help users finish tasks and make them available in chat.
2. Build components just for the conversation. These exist to make responding effortless. Asking how someone wants to attend a course? Show three buttons: Online, In person, and Not sure yet. One tap beats a typed reply.
You can also add buttons that trigger an action or send the user to a page outside the chat. The goal is the same: make the next step obvious.
What Agent UI Adds to a Chatbot
Agent UI lets your website mount custom UI inside the chatbot transcript whenever a tool runs.
Instead of text, the chat can render anything:
- Cards
- Forms
- Buttons
- Location pickers
Just about anything.
The assistant still decides when a tool runs. The tool still produces structured data. But your website decides how that data looks.
That separation matters:
- The model handles intent.
- Predictable Dialogs handles tool execution and chat state.
- Your frontend handles the interface.
Three Ways to Display UI in an AI Conversation
Predictable Dialogs gives you three mechanisms.
1. Render UI from tool output
This works like a regular web app: call an API, get data, render it.
In an AI conversation, that API call is a tool the LLM can invoke. Your frontend takes the tool's output and turns it into a product list, appointment slots, course cards, or order details.
2. Render UI from JSON generated by the LLM
Skip the API. Have the LLM generate the data itself, based on the prompt and the conversation.
With the Send Data to UI tool, you define a JSON schema. The LLM produces data that follows it and sends it to your frontend, which renders the UI.
The difference is the data source: the first mechanism uses an API response, the second uses LLM-generated data.
3. Render UI to collect user input
Here the LLM needs something from the user, so it asks through a form or other interactive UI.
With the Request User Input tool, the conversation pauses while the user fills in and submits the request. Their answer goes back to the LLM, which picks up where it left off.
This is a human-in-the-loop flow. The first two mechanisms supply data for the UI and carry on without waiting. The third stops and waits for the user before the LLM continues.
The Basic Shape
The web widget accepts an agentUi option:
Agent.initStandard({
  agentName: 'your-agent-name',
  agentUi: {
    css: `
      .product-card {
        display: grid;
        gap: 8px;
        border: 1px solid #d1d5db;
        border-radius: 12px;
        padding: 12px;
      }
    `,
    components: {
      show_product: renderProductCard,
    },
  },
})
agentUi.components maps tool names to renderer functions. The key must match the tool name copied from the Predictable Dialogs dashboard.
agentUi.css holds the CSS for those components, so renderer styling lives right next to the renderer registration.
For the full TypeScript shape, see the Custom Agent UI API reference.
Example: Show Tool Output as Course Cards
Here's the pattern in a real chat UI. The AOL Guide assistant renders course search results as cards inside the conversation:
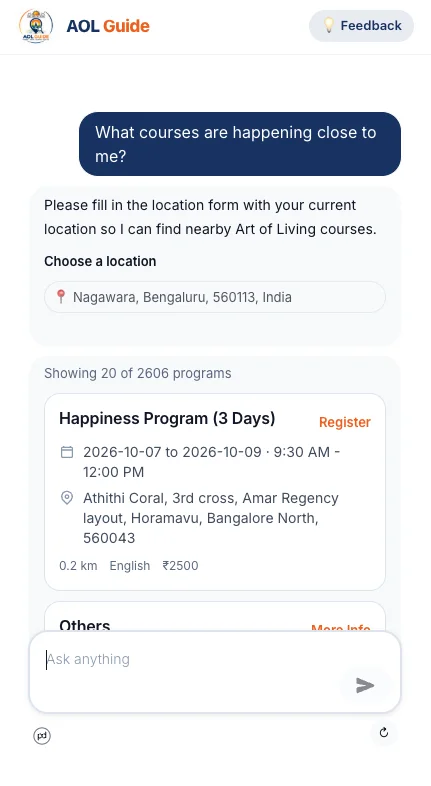
Say a tool named search_courses returns structured course results:
{
  "location": "Nagawara, Bengaluru",
  "courses": [
    {
      "title": "IP Teens Vacation Program",
      "date": "2026-10-06 to 2026-10-16",
      "address": "Mig 59, khb colony, 1st Stage, 3rd Main, Basveshwaranagar, Bangalore North",
      "distance": "14.6 km",
      "languages": ["English", "Kannada"],
      "price": "INR 10000",
      "registrationUrl": "https://example.com/register"
    },
    {
      "title": "Happiness Program",
      "date": "2026-10-07 to 2026-10-12, 6:00 PM - 8:30 PM",
      "address": "Art of Living Happiness Center, Jalahalli West, Dasarahalli, Bengaluru",
      "distance": "15.5 km",
      "languages": ["English", "Kannada"],
      "price": "INR 2500",
      "registrationUrl": "https://example.com/register"
    }
  ]
}
Your renderer turns that JSON into cards inside the conversation. In the AOL Guide integration, initialization looks like this:
const AOL_GUIDE_WIDGET_CSS = `
  .aol-tool-results {
    display: grid;
    gap: 10px;
  }
  .aol-tool-results .result-card {
    display: grid;
    gap: 8px;
    border: 1px solid #e2e8f0;
    border-radius: 16px;
    background: #ffffff;
    padding: 14px;
  }
  .aol-tool-results .result-card h2 {
    margin: 0;
    color: #0f172a;
    font-size: 16px;
    font-weight: 700;
  }
`
Agent.initStandard({
  agentName: 'AOL Guide',
  agentUi: {
    css: AOL_GUIDE_WIDGET_CSS,
    components: {
      search_courses: (container, output) => {
        renderSearchCoursesToolResult(container, output, options)
      },
      get_user_location: (container, ui, context) =>
        renderUserLocationInput(container, ui, context, options.mapboxToken),
    },
  },
})
search_courses renders the course cards. get_user_location renders an input flow that collects the visitor's location. Both share one agentUi.css, because those styles belong to the same in-chat UI.
The result: structured, scannable cards instead of a wall of explanation.
This works for purpose-built UI tools, and it works just as well for any other tool output you want to turn into part of the conversation.
Render UI for Any Useful Tool Output
Here's the big idea: this isn't tied to one special tool type.
If a tool returns structured output, and that output would be clearer as an interface, register a component for it.
Good candidates:
- Search tools that return multiple results
- Availability tools that return time slots
- Account tools that return status or plan details
- Product tools that return recommendations
- Location tools that return nearby offices or campuses
- Registration tools that return next actions
The rule of thumb: if the user would benefit from scanning, selecting, comparing, confirming, or acting, a UI component beats a paragraph.
Request User Input and Send Data to UI are purpose-built for common cases. But Agent UI components work anywhere a tool's output belongs in the conversation as interface, not just text.
Use Request User Input for Interactive UI
Sometimes the assistant can't continue until the visitor gives it something.
That's what the Request User Input tool is for.
It pauses the assistant while your custom UI collects a response. Your renderer can show a form, selector, confirmation dialog, or any other control. When the visitor submits or cancels, the widget sends the result back and the conversation moves on.
Use it for lead capture, booking flows, address confirmation, qualification questions, preference selection, consent checks, and any flow where a plain text reply would be clumsy.
Use Send Data to UI for Structured Results
The Send Data to UI tool is a UI-focused special case. Use it when you want the LLM itself to generate structured JSON for your website.
Say the assistant decides the user needs a course list, product recommendation, location result, or comparison table. Send Data to UI gives the model a schema for that data. The model fills in the JSON, and your renderer displays it in the conversation.
Note the difference from updating the host page outside the chat. If you want the surrounding application to react after a tool completes, onToolResult is the right pattern. If you want the result inside the chat transcript, use Agent UI components.
Styling: Use agentUi.css for Component CSS
Predictable Dialogs also supports broader widget theming and custom CSS for the whole chat widget. Agent UI CSS is narrower by design.
Use agentUi.css for CSS that belongs to your custom renderer components:
agentUi: {
  css: `
    .appointment-card {
      border: 1px solid #e5e7eb;
      border-radius: 12px;
      padding: 12px;
    }
  `,
  components: {
    show_appointment: renderAppointment,
  },
}
Component UI stays next to its registration, and your app-specific cards, forms, and selectors stay out of the general widget theme overrides.
Working Example
See it live on the AOL Guide chat experience:
Ask the chatbot:
courses near me
When the location picker appears, choose a city or town in India, such as Bangalore. The assistant then shows course cards directly inside the chat.
The example is open source:
This chat doesn't rely on text bubbles alone. It shows where the pattern leads: a chatbot that doesn't just answer, but presents interactive, domain-specific interface pieces at exactly the moment they're useful.
Where to Start
Building custom in-chat UI? Start with the official docs:
You can also hand the job to a coding agent like Codex or Claude Code. Give it the links above, point it at the file where your chat widget is initialized, and ask it to create the custom UI renderer, register it under agentUi.components, and put the component CSS in agentUi.css.
For example:
Read these Predictable Dialogs docs:
- https://predictabledialogs.com/docs/channels/web/ui-renderers
- https://predictabledialogs.com/docs/api-reference/custom-agent-ui
- https://predictabledialogs.com/docs/tools/request-user-input
- https://predictabledialogs.com/docs/tools/send-data-to-ui
Then update my chat widget integration to render custom UI inside the chat conversation.
Use agentUi.components for the renderer map and agentUi.css for the component styles.
Start small: one tool, one component. Pick a result that's awkward as text, like a list, a form, a card, or a selector. Register it in agentUi.components, style it with agentUi.css, and let the conversation render the right interface when the assistant calls the tool.