Creating a Local LLM Agent
Estimated Time: 5 minutes
A Local LLM resource connects your agent to a self-hosted or cloud-hosted model through an OpenAI-compatible API endpoint. Use this option when you run your own model server, such as Ollama, vLLM, or another OpenAI-compatible gateway.
Token measurement may not work for Local LLM resources unless your LLM server returns token usage in the response.
Before You Start
You need:
- A running OpenAI-compatible endpoint reachable by Predictable Dialogs.
- A base URL, for example
https://<domain>/v1. - The exact model ID served by your LLM server, for example
qwen3:8b. - An API key only if your endpoint requires one.
Example: Run Ollama In The Cloud
You can run your local LLM on a cloud instance and expose it through a secure domain. Choose the model based on the CPU, memory, and GPU capacity of the cloud instance.
On the server, install Ollama:
brew install ollama
In one terminal, start the server:
ollama serve
In another terminal, download and run the model:
ollama run qwen3:8b
You can use another model instead of qwen3:8b if it better matches your instance size.
Verify that Ollama is running:
curl http://<domain>/api/tags
Then configure the Predictable Dialogs Local LLM resource with:
- Local LLM URL:
https://<domain>/v1 - Local model:
qwen3:8b
Create From The Agents Page
Step 1: Create New Agent
- Sign in to Predictable Dialogs.
- Click + Create agent.
- Give a name to your agent.
Step 2: Configure Local LLM Settings
- Click ADD AI.
- Select Local LLM as the provider.
- Enter the Local LLM URL using the OpenAI-compatible base URL, such as
https://<domain>/v1. - Enter the model ID exactly as your server exposes it, such as
qwen3:8b. - Enter an API key if your server requires one.
- Click Next to validate the endpoint and model.
Step 3: Add The Instructions
- Choose what your agent is for and adjust the personality and purpose.
- Click Next.
- Review or edit the agent behaviour instructions.
- Click Save to create the resource and connect it to your agent.
Understand The Instruction Hierarchy
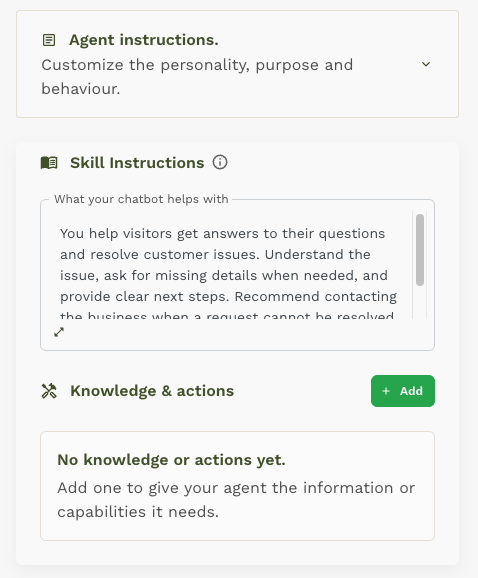
The Agent instructions section shown at the top is closed in the screenshot. It contains the provider and model details, along with the agent personality and purpose.
The Skill Instructions card contains the agent behaviour. It also contains Knowledge & actions and the Add button used to add documents, tools, and actions the agent can use. This separation is intentional: the agent personality stays separate from the skill, which defines what the agent knows how to do.
Next Steps
- Add knowledge and actions: Use the Tools overview to add searchable documents, API tools, app connections, or Custom Agent UI actions to the agent skill.
- Choose Channel: Embed your agent on your website or connect to WhatsApp.
- Test Your Agent: Send test messages to verify everything works correctly.
Troubleshooting
- If validation fails, confirm the endpoint is reachable from the public internet or your configured network.
- Make sure the URL uses the OpenAI-compatible
/v1base path. - Confirm the model ID matches the value returned by your LLM server.
- If token usage is missing in analytics, check whether your LLM server returns token usage fields.